Building Cluster-Safe Once-Only Methods with Locks, Java and Postgres or DynamoDB

In distributed systems, ensuring that certain operations execute only once across multiple instances is a critical requirement. Whether you’re processing payments, sending notifications, or performing data migrations, you need guarantees that these operations don’t accidentally run multiple times. This article explores how to use PostgreSQL advisory locks through the lock-postgres utility to create cluster-safe once-only methods in Java.

See here for our OSS implementation of cluster locks using postgresql. We also have an implementation using DynamoDB here (same API).

The Challenge of Distributed Execution

Consider a common scenario: you have multiple instances of your application running in a cluster, and each instance processes scheduled tasks. Without proper coordination, you might end up with:

  • Duplicate payment processing
  • Multiple notification emails sent
  • Race conditions in data migrations
  • Resource contention issues

Traditional Java synchronization mechanisms like synchronized blocks or ReentrantLock only work within a single JVM. For cluster-wide coordination, you need a distributed locking mechanism.

Solution 1: Using PostgreSQL Advisory Locks

PostgreSQL provides advisory locks – lightweight, application-level locks that don’t interfere with table-level locks. These locks are perfect for coordinating application logic across multiple instances.

The lock-postgres utility leverages PostgreSQL’s advisory lock functions:

  • pg_try_advisory_xact_lock(key) – Non-blocking lock attempt
  • pg_advisory_xact_lock(key) – Blocking lock acquisition

These locks are automatically released when the database transaction commits or rolls back, making them ideal for transactional operations.

Solution 2: Using DynamoDB and the AWS AmazonDynamoDBLockClient

We also have a dynamo DB solution using the AWS AmazonDynamoDBLockClient as the implementation of the Lock API. This is an implementation of the same lock API in the examples in this article.

Setting Up the Dependencies

First, add the required dependencies to your project:

PostgreSQL implementation:

<dependency>   
  <groupId>com.limemojito.oss.standards.lock</groupId>  
  <artifactId>lock-postgres</artifactId>
  <version>15.3.2</version>
</dependency>

DynamoDB Implementation

<dependency>   
  <groupId>com.limemojito.oss.standards.lock</groupId>  
  <artifactId>lock-dynamodb</artifactId>
  <version>15.3.2</version>
</dependency>

Basic Usage Pattern

The PostgresLockService implements the LockService interface and provides two primary methods for lock acquisition:

@Service
@RequiredArgsConstructor
public class OnceOnlyService {   
     private final LockService lockService;   
     private final PaymentProcessor paymentProcessor;        
     @Transactional    public void processPaymentOnceOnly(String paymentId) {
        String lockName = "payment-processing-" + paymentId;
        // Try to acquire the lock - non-blocking
        Optional<DistributedLock> lock = lockService.tryAcquire(lockName);
        if (lock.isPresent()) {           
          try (DistributedLock distributedLock = lock.get()) {                
                // Only one instance will execute this block
                paymentProcessor.process(paymentId);
                log.info("Payment {} processed successfully", paymentId);
           }
        } else {
            log.info("Payment {} is already being processed by another instance", paymentId);
        }
    }
}

Blocking vs Non-Blocking Lock Acquisition

The lock service provides two approaches:

1. Non-Blocking (tryAcquire)

@Transactional
public void tryProcessOnceOnly(String taskId) {
    Optional<DistributedLock> lock = lockService.tryAcquire("task-" + taskId);
        if (lock.isPresent()) {
        try (DistributedLock distributedLock = lock.get()) {
            // Process the task
            performCriticalOperation(taskId);
        }
    } else {
        // Task is being processed elsewhere, skip or handle accordingly
        log.info("Task {} is already being processed", taskId);
    }
}

2. Blocking (acquire)

@Transactional
public void waitAndProcessOnceOnly(String taskId) {
    // This will wait until the lock becomes available
    try (DistributedLock lock = lockService.acquire("task-" + taskId)) {
        // Guaranteed to execute once the lock is acquired
        performCriticalOperation(taskId);
    }
    // Lock is automatically released when the transaction commits
}

Real-World Example: Daily Report Generation

Let’s implement a practical example where multiple application instances need to coordinate daily report generation:

@Component
@RequiredArgsConstructor
@Slf4j
public class DailyReportService {
    private final LockService lockService;
    private final ReportRepository reportRepository;
    private final NotificationService notificationService;

    @Scheduled(cron = "0 0 2 * * *") // Run at 2 AM daily
    @Transactional
    public void generateDailyReport() {
        String today = LocalDate.now().toString();
        String lockName = "daily-report-" + today;
        Optional<DistributedLock> lock = lockService.tryAcquire(lockName);
        if (lock.isPresent()) {
            try (DistributedLock distributedLock = lock.get()) {
                log.info("Starting daily report generation for {}", today);

                // Check if report already exists (additional safety)
                if (reportRepository.existsByDate(today)) {
                    log.info("Report for {} already exists, skipping", today);
                    return;
                }
 
                // Generate the report
                Report report = generateReport(today);
                reportRepository.save(report);
 
                // Send notifications
                notificationService.sendReportGeneratedNotification(report);
                log.info("Daily report for {} generated successfully", today);
            }
        } else {
            log.info("Daily report for {} is being generated by another instance", today);
        }
    }

    private Report generateReport(String date) {
        // Implementation of report generation logic
        return new Report(date, collectDailyMetrics());
    }
}

Advanced Patterns

1. Lock with Timeout Handling

For blocking locks, you can implement timeout handling using Spring’s @Transactional timeout:

@Transactional(timeout = 30) // 30-second timeout
public void processWithTimeout(String taskId) {
    try (DistributedLock lock = lockService.acquire("timeout-task-" + taskId)) {
        performLongRunningOperation(taskId);
    } catch (DataAccessException e) {
        log.error("Failed to acquire lock within timeout period", e);
        throw new LockTimeoutException("Could not acquire lock for task: " + taskId);
    }
}

2. Hierarchical Locking

Create hierarchical locks for complex operations:

@Transactional
public void processOrderWithHierarchy(String customerId, String orderId) {
    // First acquire customer-level lock
    try (DistributedLock customerLock = lockService.acquire("customer-" + customerId)) {
        // Then acquire order-level lock
        try (DistributedLock orderLock = lockService.acquire("order-" + orderId)) {
            processOrderSafely(customerId, orderId);
        }
    }
}

3. Conditional Processing with Fallback

@Transactional
public ProcessingResult processWithFallback(String taskId) {
    Optional<DistributedLock> lock = lockService.tryAcquire("primary-task-" + taskId);
    if (lock.isPresent()) {
        try (DistributedLock distributedLock = lock.get()) {
            return performPrimaryProcessing(taskId);
        }
    } else {
        // Primary processing is happening elsewhere, perform alternative action
        return performAlternativeProcessing(taskId);
    }
}

Configuration and Best Practices

1. Database Configuration

Ensure your PostgreSQL database is properly configured for advisory locks:

-- Check current lock status
SELECT * FROM pg_locks WHERE locktype = 'advisory';
-- Set appropriate connection and statement timeouts
SET statement_timeout = '30s';
SET lock_timeout = '10s';

2. Spring Configuration

Configure your PostgresLockService bean:

@Configuration
public class LockConfiguration {
    @Bean
    public LockService lockService(JdbcTemplate jdbcTemplate) {
        return new PostgresLockService(jdbcTemplate);
    }
}

Key Benefits and Considerations

Benefits:

  • Cluster-safe: Works across multiple JVM instances
  • Transactional: Automatically releases locks on transaction completion
  • Lightweight: No additional infrastructure required
  • Reliable: Leverages PostgreSQL’s proven lock mechanisms
  • Flexible: Supports both blocking and non-blocking approaches

Considerations:

  • Database dependency: Requires PostgreSQL database connection
  • Transaction requirement: Locks must be used within database transactions
  • Lock key collision: Different lock names with same hash could collide
  • Connection pooling: Consider impact on database connection pools

Conclusion

PostgreSQL advisory locks provide a robust foundation for implementing cluster-safe once-only methods in Java applications. The lock-postgres utility simplifies this implementation by providing a clean API that integrates seamlessly with Spring’s transaction management.

By using these distributed locks, you can ensure that critical operations execute exactly once across your entire cluster, preventing data inconsistencies and duplicate processing. The transaction-based approach ensures that locks are automatically cleaned up, even in failure scenarios, making your distributed system more reliable and maintainable.

Whether you’re processing financial transactions, generating reports, or coordinating data migrations, PostgreSQL advisory locks offer a battle-tested solution for distributed coordination without the complexity of additional infrastructure components.

Using AWS Cognito, API Gateway and Spring Cloud Function Lambda for security authorisation.

This article explains using our OSS lambda-utilities to configure a spring cloud function java lambda to allow method level authorisation using API Gateway and Cognito.

See our OSS repository here.

Architecture Overview

The security setup integrates three key AWS services:

  1. AWS Cognito – Identity provider and JWT issuer
  2. AWS API Gateway – HTTP API with JWT authorizer
  3. AWS Lambda – Function execution environment

Key Components

1. ApiGatewayResponseDecoratorFactory

This is the central factory that creates decorated Spring Cloud Functions with security and error handling:

@Service
public class ApiGatewayResponseDecoratorFactory {
// Creates decorated functions that handle security, errors, and responses
public <Input, Output> Function<Input, APIGatewayV2HTTPResponse> create(Function<Input, Output> function)
}

Purpose:

  • Wraps your business logic functions
  • Automatically handles authentication extraction from API Gateway events
  • Converts exceptions to proper HTTP responses
  • Manages Spring Security context

2. Security Configuration Setup

The security is configured through : AwsCloudFunctionSpringSecurityConfiguration

@EnableMethodSecurity
@Configuration
@Import({LimeJacksonJsonConfiguration.class, ApiGatewayResponseDecoratorFactory.class})
@ComponentScan(basePackageClasses = ApiGatewayAuthenticationMapper.class)
public class AwsCloudFunctionSpringSecurityConfiguration

This enables:

  • Method-level security (@PreAuthorize@Secured, etc.)
  • Automatic authentication mapping
  • Exception handling for security violations

3. Authentication Flow

The authentication process works as follows:

  1. API Gateway receives request with JWT token in Authorization header
  2. JWT Authorizer validates the token against Cognito
  3. API Gateway forwards the validated JWT claims in the request context
  4. extracts authentication from the event: 
    • Reads JWT claims from request context
    • Creates object ApiGatewayAuthentication
    • Maps Cognito groups to Spring Security authorities
    ApiGatewayAuthenticationMapper
  5. Spring Security context is populated for method-level security

AWS Infrastructure Setup

API Gateway Configuration

# Example CDK/CloudFormation for HTTP API with JWT Authorizer
HttpApi:
Type: AWS::ApiGatewayV2::Api
Properties:
Name: MySecureApi
ProtocolType: HTTP

JwtAuthorizer:
Type: AWS::ApiGatewayV2::Authorizer
Properties:
ApiId: !Ref HttpApi
AuthorizerType: JWT
IdentitySource:
- $request.header.Authorization
JwtConfiguration:
Audience:
- your-cognito-client-id
Issuer: https://cognito-idp.{region}.amazonaws.com/{user-pool-id}

Route:
Type: AWS::ApiGatewayV2::Route
Properties:
ApiId: !Ref HttpApi
RouteKey: POST /secure-endpoint
Target: !Sub integrations/${LambdaIntegration}
AuthorizerId: !Ref JwtAuthorizer
AuthorizationType: JWT

Cognito Configuration

UserPool:
Type: AWS::Cognito::UserPool
Properties:
UserPoolName: MyAppUsers
Schema:
- Name: email
AttributeDataType: String
Required: true
Policies:
PasswordPolicy:
MinimumLength: 8

UserPoolClient:
Type: AWS::Cognito::UserPoolClient
Properties:
UserPoolId: !Ref UserPool
ClientName: MyAppClient
GenerateSecret: false
ExplicitAuthFlows:
- ADMIN_NO_SRP_AUTH
- USER_PASSWORD_AUTH

Implementation Example

1. Create Your Business Function

@Component
public class SecureBusinessLogic {

public String processSecureData(MyRequest request) {
// Your business logic here
return "Processed: " + request.getData();
}
}

2. Create the Lambda Handler

@Configuration
@Import(LimeAwsLambdaConfiguration.class)
public class LambdaConfiguration {

@Autowired
private ApiGatewayResponseDecoratorFactory decoratorFactory;

@Autowired
private SecureBusinessLogic businessLogic;

@Bean
public Function<APIGatewayV2HTTPEvent, APIGatewayV2HTTPResponse> secureFunction() {
return decoratorFactory.create(event -> {
// Extract request body
MyRequest request = parseRequest(event.getBody());

// Business logic with automatic security context
return businessLogic.processSecureData(request);
});
}
}

3. Add Method-Level Security

@Component
public class SecureBusinessLogic {

@PreAuthorize("hasAuthority('ADMIN')")
public String processAdminData(MyRequest request) {
return "Admin processed: " + request.getData();
}

@PreAuthorize("hasAuthority('USER') or hasAuthority('ADMIN')")
public String processUserData(MyRequest request) {
return "User processed: " + request.getData();
}
}

4. Access Current User Context

@Bean
public Function<APIGatewayV2HTTPEvent, APIGatewayV2HTTPResponse> contextAwareFunction() {
return decoratorFactory.create(event -> {
// Access current authentication
ApiGatewayContext context = decoratorFactory.getCurrentApiGatewayContext();
ApiGatewayAuthentication auth = context.getAuthentication();

if (auth.isAuthenticated()) {
String username = auth.getPrincipal().getName();
Set<String> groups = auth.getAuthorities()
.stream()
.map(GrantedAuthority::getAuthority)
.collect(Collectors.toSet());

return new UserResponse(username, groups, "Success");
} else {
return new UserResponse("anonymous", Set.of("ANONYMOUS"), "Limited access");
}
});
}

Configuration Properties

The authentication mapper supports several configuration properties:

com:
limemojito:
aws:
lambda:
security:
claimsKey: "cognito:groups" # Cognito groups claim
anonymous:
sub: "ANONYMOUS"
userName: "anonymous"
authority: "ANONYMOUS"

Security Benefits

  1. Automatic JWT Validation: API Gateway validates tokens before reaching Lambda
  2. Claims Extraction: Automatic mapping of Cognito user groups to Spring authorities
  3. Method Security: Use standard Spring Security annotations
  4. Exception Handling: Automatic conversion of security exceptions to HTTP responses
  5. Context Access: Easy access to user information and claims
  6. Anonymous Support: Graceful handling of unauthenticated requests

Error Handling

The decorator automatically handles:

  • Authentication failures → 401 Unauthorized
  • Authorization failures → 403 Forbidden
  • Validation errors → 400 Bad Request
  • General exceptions → 500 Internal Server Error

This architecture provides a robust, scalable security solution that leverages AWS managed services while maintaining clean separation of concerns in your Spring Cloud Function implementation.

Debugging Maven Projects with Conflicting JAR Versions

Maven dependency conflicts are one of the most frustrating issues developers encounter when building Java applications. When multiple versions of the same library exist in your classpath, it can lead to runtime errors, unexpected behavior, and difficult-to-debug issues. This article provides a comprehensive guide to identifying, understanding, and resolving JAR version conflicts in Maven projects.

Understanding Dependency Conflicts

What Are Dependency Conflicts?

Dependency conflicts occur when your project’s dependency tree contains multiple versions of the same artifact (same groupId and artifactId but different versions). Maven’s dependency resolution mechanism will choose one version based on its rules, but this choice might not be compatible with all parts of your application.

Common Symptoms

  • ClassNotFoundException or NoClassDefFoundError at runtime
  • NoSuchMethodError or AbstractMethodError
  • IncompatibleClassChangeError
  • Unexpected behavior in libraries that worked in isolation
  • Different behavior between development and production environments

Identifying Conflicts

1. Using Maven Dependency Plugin

The most effective way to identify conflicts is using Maven’s built-in dependency plugin:

mvn dependency:tree

This command shows your complete dependency tree. Look for multiple versions of the same artifact:

[INFO] +- com.fasterxml.jackson.core:jackson-core:jar:2.13.0:compile
[INFO] +- com.fasterxml.jackson.core:jackson-databind:jar:2.13.0:compile
[INFO] |  \- com.fasterxml.jackson.core:jackson-core:jar:2.12.0:compile (omitted for conflict with 2.13.0)

2. Analyzing Conflicts with Verbose Output

For more detailed conflict analysis:

mvn dependency:tree -Dverbose

This shows which dependencies are omitted due to conflicts and why Maven chose specific versions.

3. Using the Dependency Analyze Goal

mvn dependency:analyze

This command identifies:

  • Used undeclared dependencies
  • Unused declared dependencies
  • Potential conflicts

4. IDE-Based Analysis

Most modern IDEs provide visual dependency analysis:

  • IntelliJ IDEA: Right-click on pom.xml → Analyze Dependencies
  • Eclipse: Project Properties → Java Build Path → Libraries → Maven Dependencies

Understanding Maven’s Resolution Strategy

Maven uses these rules to resolve conflicts:

  1. Nearest Definition: Dependencies closer to the root in the dependency tree win
  2. First Declaration: If dependencies are at the same depth, the first one declared wins
  3. Version Range: Explicit version ranges override transitive dependencies

Resolution Strategies

1. Explicit Dependency Declaration

The most straightforward approach is to explicitly declare the version you want:

<dependencies>    
  <dependency>
    <groupId>com.fasterxml.jackson.core</groupId>
    <artifactId>jackson-core</artifactId>
    <version>2.13.0</version>
  </dependency>
</dependencies>

2. Dependency Management Section

Use the <dependencyManagement> section to centrally manage versions:

<dependencyManagement>    
  <dependencies>        
    <dependency>
      <groupId>com.fasterxml.jackson.core</groupId>
      <artifactId>jackson-core</artifactId> 
      <version>2.13.0</version>   
    </dependency>
  </dependencies>
</dependencyManagement>

3. Excluding Transitive Dependencies

Exclude problematic transitive dependencies:

<dependency>    
  <groupId>org.springframework</groupId>  
  <artifactId>spring-web</artifactId>   
  <version>5.3.0</version>  
  <exclusions>
     <exclusion>     
        <groupId>com.fasterxml.jackson.core</groupId>       
        <artifactId>jackson-core</artifactId>  
        </exclusion>  
     </exclusions>
</dependency>

4. Using Maven Enforcer Plugin

Prevent conflicts by failing the build when they occur:

<plugin>    
  <groupId>org.apache.maven.plugins</groupId> 
  <artifactId>maven-enforcer-plugin</artifactId>
  <version>3.0.0</version> 
  <executions>       
    <execution>
       <id>enforce-no-duplicate-dependencies</id>        
       <goals>            
         <goal>enforce</goal>       
       </goals>  
       <configuration>       
          <rules>                
            <dependencyConvergence/>        
            <requireNoRepositories/>           
          </rules>  
       </configuration>   
     </execution>
   </executions>
</plugin>

Advanced Debugging Techniques

1. Creating a Dependency Report

Generate detailed dependency reports:

mvn project-info-reports:dependencies

This creates an HTML report showing all dependencies and their relationships.

2. Using Maven’s Debug Output

Run Maven with debug output to see detailed resolution information:

mvn -X dependency:tree

3. Checking Effective POM

View the effective POM to see resolved dependencies:

mvn help:effective-pom

Best Practices

1. Use Bill of Materials (BOM)

Import BOMs for consistent dependency versions:

<dependencyManagement>  
  <dependencies>       
    <dependency>       
      <groupId>org.springframework.boot</groupId>    
      <artifactId>spring-boot-dependencies</artifactId>      
      <version>2.7.0</version>     
      <type>pom</type>      
      <scope>import</scope>      
    </dependency>    
  </dependencies>
</dependencyManagement>

2. Regular Dependency Updates

Keep dependencies up to date and use tools like:

  • mvn versions:display-dependency-updates
  • mvn versions:use-latest-releases

3. Minimize Direct Dependencies

Reduce the number of direct dependencies to minimize conflict opportunities.

4. Use Dependency Scopes Appropriately

  • compile: Default scope
  • provided: Available at compile time but not packaged
  • runtime: Not needed for compilation but required at runtime
  • test: Only available during testing

Preventing Future Conflicts

1. Establish Dependency Governance

  • Create a team-wide dependency management strategy
  • Use parent POMs for version consistency
  • Regular dependency audits

2. Automated Conflict Detection

Integrate conflict detection into your CI/CD pipeline:

<plugin>    <groupId>org.apache.maven.plugins</groupId>    <artifactId>maven-dependency-plugin</artifactId>    <executions>        <execution>            <goals>                <goal>analyze-only</goal>            </goals>            <configuration>                <failOnWarning>true</failOnWarning>            </configuration>        </execution>    </executions></plugin>

3. Version Range Strategy

Be cautious with version ranges. Prefer specific versions for stability:

<!-- Avoid --><version>[1.0,2.0)</version>
<!-- Prefer --><version>1.5.2</version>

Common Conflict Scenarios

Spring Framework Conflicts

Spring projects often have complex dependency trees. Use Spring Boot’s dependency management or Spring Framework BOM.

Logging Framework Conflicts

Multiple logging frameworks (Log4j, Logback, Commons Logging) often conflict. Use SLF4J as a facade and bridge other frameworks.

Jackson Library Conflicts

Jackson modules must use compatible versions. Manage them centrally in dependencyManagement.

Conclusion

Debugging Maven dependency conflicts requires a systematic approach:

  1. Identify conflicts using Maven tools
  2. Understand Maven’s resolution strategy
  3. Apply appropriate resolution techniques
  4. Prevent future conflicts with good practices

The key is to be proactive rather than reactive. Establish good dependency management practices early in your project lifecycle, and use automated tools to catch conflicts before they reach production.

Remember that dependency conflicts are often symptoms of deeper architectural issues. Sometimes the best solution is to refactor your application to reduce complex dependency chains rather than working around conflicts with exclusions and forced versions.

By following these practices and using the tools outlined in this article, you’ll be well-equipped to handle even the most complex dependency conflict scenarios in your Maven projects.

AWS unit testing with LocalStack, Docker and Java

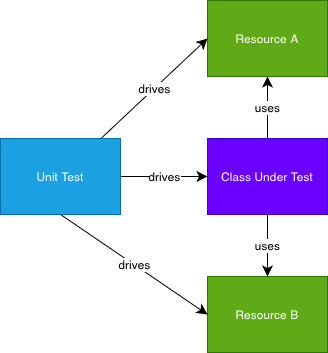
Traditionally unit testing is performed with a class being injected with mocks for its dependencies, so testing is focused just on the behaviours of the class under consideration.

Figure 1: Unit Test class responsibilities

While this is effective for “simple” dependent APIs that may only have a few behaviours, for complex resources such as databases, web service APIs such as DynamoDB, etc it can make sense to unit test using a “fast” implementation of the real resource. By “fast” here we mean quick to setup and tear down so that we can concentrate our effort on the behaviours of the class being tested.

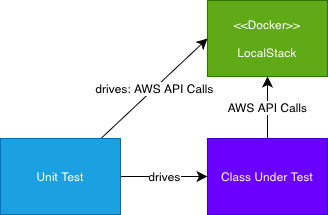
Modern development is tied closely to cloud native APIs such as AWS. We can use a “fast” stub of AWS service with LocalStack deployed on docker. This gives us in memory, localhost based AWS services for most of the available APIs.

Figure 2: LocalStack Unit Test for AWS resources

How to do this using Java and Maven

Using our oss-maven-standards build system we have enabled optional Docker style unit testing using Surefire under Maven. An example layout with docker compose configuration, etc can be seen in the java-lambda-poc module.

Use the any of our parent POMs as your maven archetype.

Set your pom.xml’s parent to one of our archetypes to get docker support. For example, when building a java lambda:

<parent>
    <groupId>com.limemojito.oss.standards</groupId>
    <artifactId>java-lambda-development</artifactId>
    <version>15.2.7</version>
    <relativePath/>
</parent>

Enable docker for unit test mode

This is done in the properties section of the pom.xml

<properties>
   ...
   <!-- Test docker unit test... -->
   <docker.unit.test>true</docker.unit.test>
   ...
</properties>

For Spring Boot testing, set active profile to “integration-test”

We are using our S3Support test utilities to build a set of S3 resources around our unit test. These automatically configure LocalStack when the configuration is imported as below.

@ActiveProfiles("integration-test")
@SpringBootTest(classes = S3SupportConfig.class)
public class S3DockerUnitTest {

    @Autowired
    private S3Support s3;

Write your unit test

Now we can write a unit test that is backed by LocalStack’s S3 implementation in docker when the test runs:

    @Test
    public void shouldDoThingsWithS3AsAUnitTest() {
        s3.putData(s3Uri, "text/plain", "hello world".getBytes(UTF_8));
        assertThat(s3.keyExists(s3Uri)).withFailMessage("Key %s is missing", s3Uri)
                                       .isTrue();
    }

Full Source Example

https://github.com/LimeMojito/oss-maven-standards/tree/master/development-test/jar-lambda-poc

Surprise: AWS SnapStart needs a new image

When using AWS SnapStart to optimise our Java Lambdas, we’ve noticed an interesting caveat:

If the lambda is not invoked for a long period of time (say a week) then the snapshot image is discarded. The next invocation will generate a new image.

While this is not an issue for a lambda endpoint with some volume, for low volume lambdas, such as site where New User Onboarding may be rare, this means that the user experience may be poor as there could be a two minute delay on the invocation! In our situation we had a five second timeout on the call so this breaks immediately.

How do we work around this?

  • Keep the lambda version hot with pre-provisioning of 1 (see Pre-provisioning concurrency). This has an AWS cost based on your lambda memory settings.
  • “Nudge” the lambda by invoking it once a day on a timer. This has an AWS cost but only one invocation.
  • “Tie” the lambda image to another behaviour with higher volume by using lambda based routing. As the higher volume invokes the image more often, snapshot staleness doesn’t occur.
  • Replace the Java lambda with Javascript / python etc that has a lower cold start time.

Keeping a lambda SnapStart image hot with pre-provisioning

Adjust your deployment to set pre-provisioned concurrency to at least 1. Be aware that you will be charged for the lambda execution as if the lambda was running for the provisioned time.

Consider an ARM (cheaper) 1GB lambda provisioned for one day in us-west-2 (Oregon)

$0.0000033334 for every GB-second x 60 x 60 x 24
= 0.0000033334 x 86400
= USD $0.288 per day
= USD $105.12 per year

Plus execution time costings for actual invocation.

Keeping a lambda SnapStart image hot with a timer

Adjust your deployment by creating a CloudWatch event to invoke your lambda once a day. This tutorial, while focusing on Javascript, is applicable for the CloudWatch setup to invoke the Java lambda.

Note the response can be ignored, we are simply invoking so that the image remains hot. An example AWS cost of for an ARM (cheaper) 1GB lambda provisioned in us-west-2 (Oregon) with a 250ms execution time:
$0.0000000133 for every GB ms x 250
= USD $0.0000033250 per day
= USD $0.00123 per year

This may also be within the “free tier” for lambda invocations depending on your site traffic.

For an example using Java CDK: See our OSS example here.

“Tying” Lambda images together

In our scenario, we have a User Group Calculation lambda that is called at the session start for all logged in users that has a similar library and construction to the New User Onboarding. Given the volume of the User Group Calculation the image never becomes stale.

We adjust our deployment configuration so that the entry points for the User Group Calculation and the New User Onboarding point to the same Lambda image. That lambda implementation switches between the two functions based on the request event structure.

At the cost of moving routing into the implementation, we have tied the high volume and low volume calls so that the share image never becomes stale.

Replacing Java SnapStart lambda implementation

Another option is to replace the low volume Java lambda with interpreted code that will not suffer from the SnapStart image staleness. A Javascript lambda would be lighter weight, and if the lambda code is not too complex it could be crafted without middle wares to speed lambda time.

However this introduces more of a polyglot language approach, which we wanted to avoid as we have a lot of in house libraries that speed our Java development.

Conclusion

For our start-up software we decided to use the day timer as the AWS cost was trivial and we could apply a standard approach into our CDK module for lambda deployment.

Beware low volume Java lambdas and SnapStart.

Version Dependency Updates Automated in Maven

Version housekeeping of libraries and 3rd party code is a requirement in maintaining a strong resistance to security vulnerabilities in your product. We use maven as our build tool standard, and the Maven Versions Plugin from MojoHaus to update versions on an automated basis.

For the maven build, there are three sorts of dependencies that we automate:

  1. Maven plugins – the building blocks that our build uses.
  2. Explicit dependencies – the libraries that our application uses
  3. Property based dependencies – these usually relate to a set of individual dependencies that use the same version, or for build reasons the version is a reference to a maven property value.

Note that the versions plugin is limited with updating plugin dependencies. It can only produce a report of available version updates – the plugin version must be manually updated in the pom.xml.

Version update process

Versioning Maven project plugins

Run mvn versions:display-plugin-updates and a report will be generated showing version updates available and which module pom.xml needs to be updated.

Versioning Maven project dependencies

Run the commands below to update both explicit and property based <version>w.x.y.z</version> elements in all modules pom.xml. It is suggested that this is run on code that is checked into a version control system so you can see the changes easily.

mvn versions:update-parent -DgenerateBackupPoms=false 
mvn versions:update-properties -DgenerateBackupPoms=false 
mvn versions:use-latest-releases -DgenerateBackupPoms=false

Semi Automated versions script to combine both steps

Note this this script does an interactive report on plugins that may have updates available.

#!/bin/bash
mvn versions:display-plugin-updates | more 
mvn versions:update-parent -DgenerateBackupPoms=false           
mvn versions:update-properties -DgenerateBackupPoms=false 
mvn versions:use-latest-releases -DgenerateBackupPoms=false

Configuring the versions plugin to stop false updates

Sadly due to the age of some of the java libraries, there are “poor” versioning choices in some of the older java libraries. You can configure the versions plugin to not consider certain versions as part of its update or not decision making. This can be useful to exclude alpha, beta, release candidate (rc) style naming, etc.

See a full implementation as part of our oss-maven-standards pom.xml on GitHub which excludes some common naming issues that we have found in our development. Feel free to use our open standards for your own projects too!

<plugin>
    <groupId>org.codehaus.mojo</groupId>
    <artifactId>versions-maven-plugin</artifactId>
    <configuration>
        <ruleSet>
            <ignoreVersion>
                <type>regex</type>
                <!-- Ignore alpha and beta -->
                <version>.+-(alpha|beta).+</version>
            </ignoreVersion>
            …

Optimising AWS SnapStart and Spring Boot Java Lambdas

This article looks at optimising a Java Spring Boot application (Cloud Function style) with AWS SnapStart, and covered advanced optimisation with lifecycle management of pre snapshots and post restore of the application image by AWS SnapStart. We cover optimising a lambda for persistent network connection style conversational resources, such as an RDBMS, SQL, legacy messaging framework, etc.

How Snap Start Works

To import start up times for a cold start, SnapStart snapshots a virtual machine and uses the restore of the snapshot rather than the whole JVM + library startup time. For Java applications built on frameworks such as Spring Boot, this provides order of magnitude time reductions on cold start time. For a comparison with raw, SnapStart and Graal Native performance see our article here.

What frameworks do we use with Spring Boot?

For our Java Lambdas we use Spring Cloud Function with the AWS Lambda Adaptor. For an example for how we set this up, and links to our development frameworks and code, see our article AWS SnapStart for Faster Java Lambdas

Default SnapStart: Simple Optimisation of the Lambda INIT phase

When the lambda version is published SnapStart will run up the Java application to the point that the lambda is initialised. For a spring cloud function application, this will complete the Spring Boot lifecycle to the Container Started phase. In short, all your beans will be constructed, injected and started from a Spring Container perspective.

AWS: Lambda Execution Lifecycle

SnapStart will then snapshot the virtual machine with all the loaded information. When the image is restored, the exact memory layout of all classes and data in the JVM is restored. Thus any data loaded in this phase as part of a Spring Bean Constructor, @PostCreate annotated methods and ContextRefresh event handlers will have been reloaded as part of the restore.

Issues with persistent network connections

Where this breaks down is if you wish to use a “persistent” network connection style resource, such as a RDBMS connection. In this example, usually in a Spring Boot application a Data Source is configured and the network connections initialised pre container start. This can cause significant slow downs when restoring an image, perhaps weeks after its creation, as all the network connections will be broken.

For a self healing data source, when a connection is requested the connection will check, timeout and have to reconnect the connection and potentially start a new transaction for the number of configured connections in the pool. Even if you smartly set the pool size to one, given the single threaded lambda execution model, that connection timeout and reconnect may take significant time depending on network and database settings.

Advanced Java SnapStart: CRaC Lifecycle Management

Project CRaC, Co-ordinated Restore at Checkpoint, is a JVM project that allows responses to the host operating system having a checkpoint pre a snapshot operation, and the signal that a operating system restore has occurred. The AWS Java Runtime supports integration with CRaC so that you can optimise your cold starts even under SnapStart.

At the time of our integration, we used the CRaC library to create a base class that could be used to create a support class that can handle “manual” tailoring of preSnapshot and postRestore events. Newer versions of boot are integrating CRaC support – see here for details.

We have created a base class, SnapStartOptimizer, that can be used to create a spring bean that can respond to preSnapshot and postRestore events. This gives us two hooks into the lifecycle:

  1. Load more data into memory before the snapshot occurs.
  2. Restore data and connections after we are running again.

Optimising pre snapshot

In this example we have a simple Spring Component that we use to exercise some functionality (http based) to load and lazy classes, data, etc. We also exercise the lookup of our spring cloud function definition bean.

@Component
@RequiredArgsConstructor
public class SnapStartOptimisation extends SnapStartOptimizer {

    private final UserManager userManager;
    private final TradingAccountManager accountManager;
    private final TransactionManager transactionManager;

    @Override
    protected void performBeforeCheckpoint() {
        swallowError(() -> userManager.fetchUser("thisisnotatoken"));
        swallowError(() -> accountManager.accountsFor(new TradingUser("bob", "sub")));
        final int previous = 30;
        final int pageSize = 10;
        swallowError(() -> transactionManager.query("435345345",
                                                    Instant.now().minusSeconds(previous),
                                                    Instant.now(),
                                                    PaginatedRequest.of(pageSize)));
        checkSpringCloudFunctionDefinitionBean();
    }
}

Optimising post restore – LambdaSqlConnection class.

In this example we highlight our LambdaSqlConnection class, which is already optimised for SnapStart. This class exercises a delegated java.sql.Connection instance preSnapshot to confirm connectivity, but replaces the connection on postRestore. This class is used to implement a bean of type java.sql.Connection, allowing you to write raw JDBC in lambdas using a single RDBMS connection for the lambda instance.

Note: Do not use default Spring Boot JDBC templates, JPA, Hibernate, etc in lambdas. The overhead of the default multi connection pools, etc is inappropriate for lambda use. For heavy batch processing a “Run Task” ECS image is more appropriate, and does not have 15 minute timeout constraints.

So how does it work?

Instances and interfaces managed by LambdaSqlConnection
  1. The LambdaSqlConnection class manages the Connection bean instance.
  2. When preSnapshot occurs, LambdaSqlConnection closes the Connection instance.
  3. When postRestore occurs, LambdaSqlConnection reconnects the Connection instance.

Because LambdaSqlConnection creating a dynamic proxy as the Connection instance, it can manage the delegated connection “behind” the proxy without your injected Connection instance changing.

Using Our SQL Connection replacement in Spring Boot

See the code at https://github.com/LimeMojito/oss-maven-standards/tree/master/utilities/aws-utilities/lambda-sql.

Maven dependency:

<dependency>
   <groupId>com.limemojito.oss.standards.aws</groupId>
   <artifactId>lambda-sql</artifactId>
   <version>15.0.2</version>
</dependency>

Importing our java.sql.Connection interceptor

@Import(LambdaSqlConnection.class)
@SpringBootApplication
public class MySpringBootApplication {

You can now remove any code that is creating a java.sql.Connection and simply use a standard java.sql.Connection instance injected as a dependency in your code. This configuration creates a java.sql.Connection compatible bean that is optimised with SnapStart and delegates to a real SQL connection.

Configuring your (real) DB connection

Example with Postgres driver.

lime:
  jdbc:
    driver:
      classname: org.postgresql.Driver
    url: 'jdbc:postgresql://localhost:5432/postgres'
    username: postgres
    password: postgres

Example spring bean using SQL

@Service
@RequiredArgsConstructor
public class MyService {
    private final Connection connection;

    @SneakyThrows
    public int fetchCount() {
      try(Statement statement = connection.createStatement()){
         try(ResultSet results = statement.executeQuery("count(1) from some_table")) {
             results.next();
             results.getInt(1);
         }
      }
    }
}

References

Deploying Java Lambda with Localstack

We deploy and debug our Java Lambda on development machines using Localstack to emulate and Amazon Web Services (AWS) account. This article walks through the architecture, deployment using our open source java framework to local stack and enabling a debug mode for remote debugging using any Java integrated development environment (IDE).

These capabilities live in our test-utilities module, LambdaSupport.java.

Localstack development architecture

Our build framework uses Docker to deploy a Localstack image, then we use AWS Api calls to deploy a zip of our lambda java classes to the Localstack lambda engine. Due to the size of the zip files, we need to deploy the lambda using a S3 url. We use Localstack’s S3 implementation to emulate the process.

When the lambda is deployed, the Localstack Lambda engine will pull the AWS Lambda Runtime image from public ECR and then perform the deployment steps. Using the Localstack endpoint for lambda we now have a full environment where we can perform a lambda.invoke to test the deployed function.

Figure 1: Development architecture using Localstack for lambda deployment

Viewing lambda logs

With the appropriate Localstack configuration we can view lambda logs for both startup and run of the lambda. Note these logs appear in the docker logs for the AWS Lambda Runtime Container. This container spins up when the lambda is deployed.

The easiest method we use to see the logs is to:

  1. Run the Junit test in debug, with a breakpoint after the lambda invoke.
  2. When the breakpoint is hit, use docker ps and docker logs to see the output of the Lambda Runtime.
  3. In IntelliJ Ultimate, you can see the containers deployed via the Services pane after connecting to your docker daemon.

Using the architecture in debug mode

We can use this architecture to remote debug the deployed lambda. Our LambdaSupport class includes configuration on deploy to enable debug mode as per the Localstack documentation https://docs.localstack.cloud/user-guide/lambda-tools/debugging/. With our support class you simply switch from java() to javaDebug() and the deploy will configure the runtime for debug mode (port 5050 by default).

In your docker-compose.yml, set the environment variable LAMBDA_DOCKER_FLAGS=-p 127.0.0.1:5050:5050 -e LS_LOG=debug.

This enables port passthrough for the java debugger from localhost to port 5050 of the container (assuming that is where the JVM debugging is configured for).

Do not commit this code as it will BLOCK test threads until a debugger is connected (port 5050 by default).

Figure 2: Localstack Java Lambda debug architecture

References:

Code examples

See https://github.com/LimeMojito/oss-maven-standards/blob/master/development-test/jar-lambda-poc/src/test/java/ApplicationIT.java for a full example.

Adding test-utilities to your maven project

These are included by default if you use our jar-lambda-development parent POM.

See our post about using our build system for maven.

Otherwise you can manually add the support as below (version omitted),

<dependency>
    <groupId>com.limemojito.oss.test</groupId>
    <artifactId>test-utilities</artifactId>
    <scope>test</scope>
</dependency>
<dependency>
    <!-- Access for LambdaSupport -->
    <groupId>software.amazon.awssdk</groupId>
    <artifactId>lambda</artifactId>
    <scope>test</scope>
</dependency>
<dependency>
    <!-- Access for LambdaSupport -->
    <groupId>software.amazon.awssdk</groupId>
    <artifactId>s3</artifactId>
    <scope>test</scope>
</dependency>

Loading the lambda as a static variable in a unit test.

We recommend a static initialised once a junit setup function due to the time to deploy the lambda.

The LambdaSupport.java method performs deployment of the supplied module zip to Localstack S3, then invokes the AWS Lambda API to confirm that the lambda has started cleanly (state == Active).

private static Lambda LAMBDA;
...
// environment variables for the lambda configuration
final Map<String, String> environment = Map.of(
                    "SPRING_PROFILES_ACTIVE", "integration-test"
                    "SPRING_CLOUD_FUNCTION_DEFINITION","get"
            );
// using the lambda zip that was built in module ../jar-lambda-poc
LAMBDA = lambdaSupport.java("../jar-lambda-poc",
                            LimeAwsLambdaConfiguration.LAMBDA_HANDLER,
                            environment);

Invoking the lambda for black box testing

This example is using a static variable for the Lambda, JUnit 5 and assert4J. An AWS API Gateway event JSON is loaded and invoked to the deployed lambda. The result is asserted.

Full example is in our oss-maven-standards repository as in integration test (IT, run by failsafe).

@Test
public void shouldCallTransactionPostOkApiGatewayEvent() {
    final APIGatewayV2HTTPEvent event = json.loadLambdaEvent("/events/postApiEvent.json",
                                                             APIGatewayV2HTTPEvent.class);

    final APIGatewayV2HTTPResponse response = lambdaSupport.invokeLambdaEvent(LAMBDA,
                                                                              event,
                                                                              APIGatewayV2HTTPResponse.class);

    assertThat(response.getStatusCode()).isEqualTo(200);
    String output = json.parse(response.getBody(), String.class);
    assertThat(output).isEqualTo("world");
}

Localstack lambda deployment debug example

We alter the setup to use the deprecated javaDebug function. Do not commit this code as it will BLOCK test threads until a debugger is connected (port 5050 by default).

For a clean setup in Intelij that waits for the lambda to start in debug mode, see the excellent article on Localstack https://docs.localstack.cloud/user-guide/lambda-tools/debugging/ “Configuring IntelliJ IDEA for remote JVM debugging”.

// using the lambda zip that was built in module ../jar-lambda-poc
LAMBDA = lambdaSupport.javaDebug("../jar-lambda-poc",
                                 LimeAwsLambdaConfiguration.LAMBDA_HANDLER,
                                 environment);

Bending Maven with Ant

Need to bend Maven to your will wthout writing a maven plugin? Some hackery with Ant and Ant-Contrib‘s if task can solve many problems.

Lime Mojito’s approach to avoiding multiple build script technologies

We use maven at Lime Mojito for most of our builds due to the wealth of maven plugins available and “hardened” plugins that are suited to our “fail fast” approach to our builds. Checkstyle, Enforcer, Jacoco Coverage are a few of the very useful plugins we use. However, sometimes you need some custom build script and doing that in maven without using exec and a shell script can be tricky.

For more details see our post on Maintainable Builds with Maven to see how we keep our “application level” pom files so small.

We try and avoid having logic “spread” amongst different implementation technologies, and reduce cognitive load when maintining software by having the logic in one place. Usually this is a parent POM from a service’s perspective, but we try to avoid the “helper script” pattem as much as possible. We also strive to reduce the number of technologies in play so that maintaining services doesn’t require learning 47 different techologies to simply deploy a cloud service.

So how can you program Maven?

Not easily. Maven is “declarative” – you are meant to declare how the plugins are executed in order inside maven’s pom.xml for a source module. If you want to include control statements, conditionals, etc like a programming language maven is not the technology to do this in.

However, there is a maven plugin, ant-run, which allows us to embed Ant tasks and their “evil” logic companion, Ant Contrib, into our maven build.

Ant in Maven! Why would you do this?

Because maven is essentially an XML file. Ant instructions are also XML and embedding in the maven POM maintain a flow while editing. Property replacement between maven and ant is almost seamless, and this gives a good maintenance experience.

And yes, the drawback is that xml can become quite verbose. If our xml gets too big we consider it a “code smell” that we may need to write a proper maven plugin.

See our post on maintainable maven for tips on how we keep our service pom files so small.

Setting up the AntRun Maven plugin to use Ant Contrib.

We have this in our base pom.xml – see our Github Repository.

We configure the maven plugin, but add a dependency for the ant-contrib library. That library is older, and has a poor dependency with ant in it’s POM so we exclude the ant jar as below. Once enabled, we can add any ant-contrib task using the XML namespace antlib:net.sf.antcontrib.

For a quick tutorial on XML and namespaces, see W3 Schools here.

<plugin>
    <groupId>org.apache.maven.plugins</groupId>
    <artifactId>maven-antrun-plugin</artifactId>
    <version>3.1.0</version>
    <!--
      This allows us to use things like if in ant tasks.  We use ant to add some control flow to
      maven builds.

      <configuration>
          <target xmlns:ac="antlib:net.sf.antcontrib">
              <ac:if>
                  ...
  -->
    <dependencies>
        <dependency>
            <groupId>ant-contrib</groupId>
            <artifactId>ant-contrib</artifactId>
            <version>1.0b3</version>
            <exclusions>
                <exclusion>
                    <groupId>ant</groupId>
                    <artifactId>ant</artifactId>
                </exclusion>
            </exclusions>
        </dependency>
    </dependencies>
</plugin>

Example one – Calculation to set a property in the pom.xml

Here we configure the ant plugin’s execution to calculate a property to be set in the maven POM.xml. This allows later tasks, and even other maven plugins, to use the set property to alter their execution. We use skip configurations a lot to separate our “full” builds from “fast builds” where a fast build might skip most checks and just produce a deliverable for manual debugging. This plugin’s execution runs in the Maven process-resources phase – before you write executions a solid understanding of the Maven Lifecycle is required.

Because the file links back to our parent pom, we do not need to repeat version, ant-contrib setup, etc. This example does not need ant-contrib.

The main trick is that we set exportAntProperties on the plugin execution so that properties we set in ant are set in the maven project object model. The Maven property <test.compose.location> is set in the <properties> section of the POM. It is replaced in the ant script before it is executed by ant seamlessly by the maven-antrun-plugin.

Note that the XML inside the <target> tag is Ant XML. We are using the condition task and an available task to see if a file exists. If it does then we set the property docker.compose.skip to true.

This example is in our java-development/pom.xml which is the base POM for all our various base POMs for jars, spring boot, Java AWS Lambdas, etc.

<plugin>
    <groupId>org.apache.maven.plugins</groupId>
    <artifactId>maven-antrun-plugin</artifactId>
    <executions>
        <execution>
            <id>identify-docker-compose</id>
            <phase>process-resources</phase>
            <goals>
                <goal>run</goal>
            </goals>
            <configuration>
                <exportAntProperties>true</exportAntProperties>
                <target>
                    <condition property="docker.compose.skip" else="false">
                        <or>
                            <equals arg1="${lime.fast-build}" arg2="true" />
                            <not>
                                <available file="${test.compose.location}" />
                            </not>
                        </or>
                    </condition>
                    <!--suppress UnresolvedMavenProperty -->
                    <echo level="info" message="docker.compose.skip is ${docker.compose.skip}" />
                </target>
            </configuration>
        </execution>
        ...

Example 2 – If we are not skipping, wait for Docker Compose up before integration test start

We use another plugin to manage docker compose before our integration test phase using failsafe for our Java integration tests. This older plugin was before docker had healthcheck support in compose files – we recommend this compose healthcheck approach in modern development. Our configuration of this plugin uses docker.compose.skip property to skip execution if set to true.

However we can specify a port in our Maven pom.xml and the build will wait until that port responds 200 on http://localhost. As ant-run is before the failsafe plugin in our declaration, its execution happens before the failsafe test run.

Note that the XML inside the <target> tag is Ant XML. The <ac:if> is using the namespace defined in the <target> element that tells ant to use the ant-contrib jar for the task. We are using the ant-contrib if task to only perform a waitFor if the docker.compose.skip property is set to false. This was performed earlier in the lifecucle by the example above.

This example is in our java-development/pom.xml which is the base POM for all our various base POMs for jars, spring boot, Java AWS Lambdas, etc.

<execution>
    <id>wait-for-docker</id>
    <phase>integration-test</phase>
    <goals>
        <goal>run</goal>
    </goals>
    <configuration>
        <target xmlns:ac="antlib:net.sf.antcontrib">
            <ac:if>
                <!--suppress UnresolvedMavenProperty -->
                <equals arg1="${docker.compose.skip}" arg2="false" />
                <then>
                    <echo level="info" message="Waiting for Docker on port ${docker.compose.port}" />
                    <waitfor maxWait="2" maxWaitUnit="minute">
                        <http url="http://localhost:${docker.compose.port}" />
                    </waitfor>
                </then>
            </ac:if>
        </target>
    </configuration>
</execution>

Conclusion

This aproach of ant hackery can produce small pieces of functionality in a maven build that can smooth the use of other plugins. Modern Ant has some support for if in a task dependency manner, but the older contrib tasks add a procedural approach that make the build cleaner in our opinion.

Why not Gradle? We have a lot of code in maven, and most of our projects fall into out standard deliverables of jars, Spring Boot jars or AWS Java Lambdas that are all easy to build in Maven. Our use of Java AWS CDK also uses maven so it ties nicely together from a limiting the number of technologies perspective. Given our service poms are so small due to our Maintainable Maven approach the benefits of Gradle seem small.

References

Mavenhttps://maven.apache.org
Maven AntRun Pluginhttps://maven.apache.org/plugins/maven-antrun-plugin/
Anthttps://ant.apache.org/manual/index.html
Ant Contrib taskshttps://ant-contrib.sourceforge.net/tasks/tasks/index.html
GitHub OSS standardshttps://github.com/LimeMojito/oss-maven-standards

AWS Development: LocalStack or an AWS Account per Developer

To test a highly AWS integrated solution, such as deployments on AWS Lambda, you can test deployments on an AWS “stub”, such as LocalStack or an AWS account per developer (or even per solution). Shared AWS account models are flawed for development as the environment can not be effectively shared with multiple developers without adding a lot of deployment complexity such as naming conventions.

What are the pros and cons of choosing a stub such as LocalStack versus an account management policy such as an AWS account per developer?

When is LocalStack a good approach?

LocalStack allows a configuration of AWS endpoints to point to a local service running stub AWS endpoints. These services implement most of the AWS API allowing a developer to check that their cloud implementations have basic functionality before deploying to a real AWS Account. LocalStack runs on a developer’s machine standalone or as a Docker container.

For example, you can deploy a Lambda implementation that uses SQS, S3, SNS, etc and test that connectivity works including subscriptions and file writes on LocalStack.

As LocalStack mimics the AWS API, it can be used with AWS-CLI, AWS SDKs, Cloudformation, CDK, etc.

LocalStack (at 28th July 2024) does not implement IAM security rules so a developer’s deployment code will not be tested for the enforcement of IAM policies.

Some endpoints (such as S3) require configuration so that the AWS API responds with URLs that can be used by the application correctly.

Using a “fresh” environment for development pipelines can be simulated by running a “fresh” LocalStack container. For example you can do a System Test environment by using a new container, provisioning and then running system testing.

If you have a highly managed and siloed corporate deployment environment, it may be easier, quicker and more pragmatic to configure LocalStack for your development team then attempt to have multiple accounts provisioned and managed by multiple specialist teams.

When is an AWS Account per developer a good approach?

An AWS account per developer can remove a lot of complexity in the build process. Rather than managing the stub endpoints and configuration, developers can be forced to deploy with security rules such as IAM roles and consider costing of services as part of the development process.

However this requires a high level of account provisioning and policy automation. Accounts need to be monitored for cost control and features such as account destruction and cost saving shutdowns need to be implemented. Security scans for policy issues, etc can be implemented across accounts and policies for AWS technology usage can be controlled using AWS Organisations.

An account per developer opens a small step to account per environment which allows the provisioning of say System Test environments on an ad hoc basis. AWS best practices for security also suggest account per service to limit blast radius and maintain separate controls for critical services such as payment processing.

If the organisation already has centralised account policy management and a strong provisioning team(s), this may be an effective approach to reduce the complexity in development while allowing modern automated pipeline practices.

Conclusion

ApproachProsCons
LocalStackCan be deployed on a developer’s machine.

Does not require using managed environments in a corporate setting.

Can be used with AWS-SDKs, AWS-CLI, Cloudformation, SAM, CDK for deployments

Development environments are separated without naming conventions in shared accounts, etc.

Fresh LocalStacks can be used to mimic environments for various development pipeline stages.

Development environment control within the development team.
Requires application configuration to use LocalStack.

Does not test security policies before deployment.

May have incomplete behaviours compared to production. Note that the most common use cases are functionally covered.

Developers are not forced to be aware of cost issues in implementations.

Developers may implement solutions and then find policy issues when deploying to real AWS accounts.
AWS Account per DeveloperRemoves stubbing and configuration effort other than setting AWS Account Id.

Development environments are separated without naming conventions in shared accounts, etc.

Forces implementations of IAM policies to be checked in development cycle.

Opens account per environment as an option for various development pipeline stages.

Developers need to be more aware of costs when designing.

Development environment control within the development team, with policies from the provisioning team.
Requires automated AWS account creation.

Requires shared AWS Organisation policy enforcement.

Requires ongoing monitoring and management of the account usage.

Requires cost monitoring if heavyweight deployments such as EC2, ECS, EKS, etc are used.
LocalStack or an AWS Account per developer: Summary

References