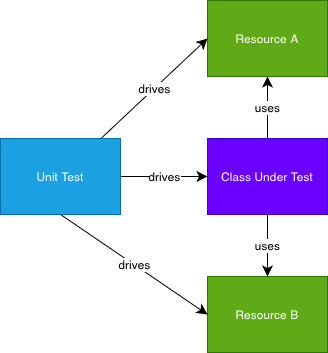
Traditionally unit testing is performed with a class being injected with mocks for its dependencies, so testing is focused just on the behaviours of the class under consideration.
Figure 1: Unit Test class responsibilities
While this is effective for “simple” dependent APIs that may only have a few behaviours, for complex resources such as databases, web service APIs such as DynamoDB, etc it can make sense to unit test using a “fast” implementation of the real resource. By “fast” here we mean quick to setup and tear down so that we can concentrate our effort on the behaviours of the class being tested.
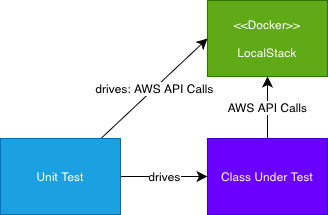
Modern development is tied closely to cloud native APIs such as AWS. We can use a “fast” stub of AWS service with LocalStack deployed on docker. This gives us in memory, localhost based AWS services for most of the available APIs.
Figure 2: LocalStack Unit Test for AWS resources
How to do this using Java and Maven
Using our oss-maven-standards build system we have enabled optional Docker style unit testing using Surefire under Maven. An example layout with docker compose configuration, etc can be seen in the java-lambda-poc module.
Use the any of our parent POMs as your maven archetype.
Set your pom.xml’s parent to one of our archetypes to get docker support. For example, when building a java lambda:
This is done in the properties section of the pom.xml
<properties>
...
<!-- Test docker unit test... -->
<docker.unit.test>true</docker.unit.test>
...
</properties>
For Spring Boot testing, set active profile to “integration-test”
We are using our S3Support test utilities to build a set of S3 resources around our unit test. These automatically configure LocalStack when the configuration is imported as below.
@ActiveProfiles("integration-test")
@SpringBootTest(classes = S3SupportConfig.class)
public class S3DockerUnitTest {
@Autowired
private S3Support s3;
Write your unit test
Now we can write a unit test that is backed by LocalStack’s S3 implementation in docker when the test runs:
@Test
public void shouldDoThingsWithS3AsAUnitTest() {
s3.putData(s3Uri, "text/plain", "hello world".getBytes(UTF_8));
assertThat(s3.keyExists(s3Uri)).withFailMessage("Key %s is missing", s3Uri)
.isTrue();
}
If the lambda is not invoked for a long period of time (say a week) then the snapshot image is discarded. The next invocation will generate a new image.
While this is not an issue for a lambda endpoint with some volume, for low volume lambdas, such as site where New User Onboarding may be rare, this means that the user experience may be poor as there could be a two minute delay on the invocation! In our situation we had a five second timeout on the call so this breaks immediately.
How do we work around this?
Keep the lambda version hot with pre-provisioning of 1 (see Pre-provisioning concurrency). This has an AWS cost based on your lambda memory settings.
“Nudge” the lambda by invoking it once a day on a timer. This has an AWS cost but only one invocation.
“Tie” the lambda image to another behaviour with higher volume by using lambda based routing. As the higher volume invokes the image more often, snapshot staleness doesn’t occur.
Replace the Java lambda with Javascript / python etc that has a lower cold start time.
Keeping a lambda SnapStart image hot with pre-provisioning
Adjust your deployment to set pre-provisioned concurrency to at least 1. Be aware that you will be charged for the lambda execution as if the lambda was running for the provisioned time.
Consider an ARM (cheaper) 1GB lambda provisioned for one day in us-west-2 (Oregon)
$0.0000033334 for every GB-second x 60 x 60 x 24 = 0.0000033334 x 86400 = USD $0.288 per day = USD $105.12 per year
Plus execution time costings for actual invocation.
Keeping a lambda SnapStart image hot with a timer
Adjust your deployment by creating a CloudWatch event to invoke your lambda once a day. This tutorial, while focusing on Javascript, is applicable for the CloudWatch setup to invoke the Java lambda.
Note the response can be ignored, we are simply invoking so that the image remains hot. An example AWS cost of for an ARM (cheaper) 1GB lambda provisioned in us-west-2 (Oregon) with a 250ms execution time: $0.0000000133 for every GB ms x 250 = USD $0.0000033250 per day = USD $0.00123 per year
This may also be within the “free tier” for lambda invocations depending on your site traffic.
In our scenario, we have a User Group Calculation lambda that is called at the session start for all logged in users that has a similar library and construction to the New User Onboarding. Given the volume of the User Group Calculation the image never becomes stale.
We adjust our deployment configuration so that the entry points for the User Group Calculation and the New User Onboarding point to the same Lambda image. That lambda implementation switches between the two functions based on the request event structure.
At the cost of moving routing into the implementation, we have tied the high volume and low volume calls so that the share image never becomes stale.
Replacing Java SnapStart lambda implementation
Another option is to replace the low volume Java lambda with interpreted code that will not suffer from the SnapStart image staleness. A Javascript lambda would be lighter weight, and if the lambda code is not too complex it could be crafted without middle wares to speed lambda time.
For our start-up software we decided to use the day timer as the AWS cost was trivial and we could apply a standard approach into our CDK module for lambda deployment.
This article looks at optimising a Java Spring Boot application (Cloud Function style) with AWS SnapStart, and covered advanced optimisation with lifecycle management of pre snapshots and post restore of the application image by AWS SnapStart. We cover optimising a lambda for persistent network connection style conversational resources, such as an RDBMS, SQL, legacy messaging framework, etc.
How Snap Start Works
To import start up times for a cold start, SnapStart snapshots a virtual machine and uses the restore of the snapshot rather than the whole JVM + library startup time. For Java applications built on frameworks such as Spring Boot, this provides order of magnitude time reductions on cold start time. For a comparison with raw, SnapStart and Graal Native performance see our article here.
What frameworks do we use with Spring Boot?
For our Java Lambdas we use Spring Cloud Function with the AWS Lambda Adaptor. For an example for how we set this up, and links to our development frameworks and code, see our article AWS SnapStart for Faster Java Lambdas
Default SnapStart: Simple Optimisation of the Lambda INIT phase
When the lambda version is published SnapStart will run up the Java application to the point that the lambda is initialised. For a spring cloud function application, this will complete the Spring Boot lifecycle to the Container Started phase. In short, all your beans will be constructed, injected and started from a Spring Container perspective.
AWS: Lambda Execution Lifecycle
SnapStart will then snapshot the virtual machine with all the loaded information. When the image is restored, the exact memory layout of all classes and data in the JVM is restored. Thus any data loaded in this phase as part of a Spring Bean Constructor, @PostCreate annotated methods and ContextRefresh event handlers will have been reloaded as part of the restore.
Issues with persistent network connections
Where this breaks down is if you wish to use a “persistent” network connection style resource, such as a RDBMS connection. In this example, usually in a Spring Boot application a Data Source is configured and the network connections initialised pre container start. This can cause significant slow downs when restoring an image, perhaps weeks after its creation, as all the network connections will be broken.
For a self healing data source, when a connection is requested the connection will check, timeout and have to reconnect the connection and potentially start a new transaction for the number of configured connections in the pool. Even if you smartly set the pool size to one, given the single threaded lambda execution model, that connection timeout and reconnect may take significant time depending on network and database settings.
Project CRaC, Co-ordinated Restore at Checkpoint, is a JVM project that allows responses to the host operating system having a checkpoint pre a snapshot operation, and the signal that a operating system restore has occurred. The AWS Java Runtime supports integration with CRaC so that you can optimise your cold starts even under SnapStart.
At the time of our integration, we used the CRaC library to create a base class that could be used to create a support class that can handle “manual” tailoring of preSnapshot and postRestore events. Newer versions of boot are integrating CRaC support – see here for details.
We have created a base class, SnapStartOptimizer, that can be used to create a spring bean that can respond to preSnapshot and postRestore events. This gives us two hooks into the lifecycle:
Load more data into memory before the snapshot occurs.
Restore data and connections after we are running again.
Optimising pre snapshot
In this example we have a simple Spring Component that we use to exercise some functionality (http based) to load and lazy classes, data, etc. We also exercise the lookup of our spring cloud function definition bean.
@Component
@RequiredArgsConstructor
public class SnapStartOptimisation extends SnapStartOptimizer {
private final UserManager userManager;
private final TradingAccountManager accountManager;
private final TransactionManager transactionManager;
@Override
protected void performBeforeCheckpoint() {
swallowError(() -> userManager.fetchUser("thisisnotatoken"));
swallowError(() -> accountManager.accountsFor(new TradingUser("bob", "sub")));
final int previous = 30;
final int pageSize = 10;
swallowError(() -> transactionManager.query("435345345",
Instant.now().minusSeconds(previous),
Instant.now(),
PaginatedRequest.of(pageSize)));
checkSpringCloudFunctionDefinitionBean();
}
}
Optimising post restore – LambdaSqlConnection class.
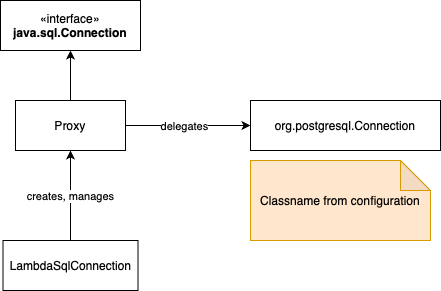
In this example we highlight our LambdaSqlConnection class, which is already optimised for SnapStart. This class exercises a delegated java.sql.Connection instance preSnapshot to confirm connectivity, but replaces the connection on postRestore. This class is used to implement a bean of type java.sql.Connection, allowing you to write raw JDBC in lambdas using a single RDBMS connection for the lambda instance.
Note: Do not use default Spring Boot JDBC templates, JPA, Hibernate, etc in lambdas. The overhead of the default multi connection pools, etc is inappropriate for lambda use. For heavy batch processing a “Run Task” ECS image is more appropriate, and does not have 15 minute timeout constraints.
So how does it work?
Instances and interfaces managed by LambdaSqlConnection
The LambdaSqlConnection class manages the Connection bean instance.
When preSnapshot occurs, LambdaSqlConnection closes the Connection instance.
When postRestore occurs, LambdaSqlConnection reconnects the Connection instance.
Because LambdaSqlConnection creating a dynamic proxy as the Connection instance, it can manage the delegated connection “behind” the proxy without your injected Connection instance changing.
Using Our SQL Connection replacement in Spring Boot
@Import(LambdaSqlConnection.class)
@SpringBootApplication
public class MySpringBootApplication {
You can now remove any code that is creating a java.sql.Connection and simply use a standard java.sql.Connection instance injected as a dependency in your code. This configuration creates a java.sql.Connection compatible bean that is optimised with SnapStart and delegates to a real SQL connection.
To test a highly AWS integrated solution, such as deployments on AWS Lambda, you can test deployments on an AWS “stub”, such as LocalStack or an AWS account per developer (or even per solution). Shared AWS account models are flawed for development as the environment can not be effectively shared with multiple developers without adding a lot of deployment complexity such as naming conventions.
What are the pros and cons of choosing a stub such as LocalStack versus an account management policy such as an AWS account per developer?
When is LocalStack a good approach?
LocalStack allows a configuration of AWS endpoints to point to a local service running stub AWS endpoints. These services implement most of the AWS API allowing a developer to check that their cloud implementations have basic functionality before deploying to a real AWS Account. LocalStack runs on a developer’s machine standalone or as a Docker container.
For example, you can deploy a Lambda implementation that uses SQS, S3, SNS, etc and test that connectivity works including subscriptions and file writes on LocalStack.
As LocalStack mimics the AWS API, it can be used with AWS-CLI, AWS SDKs, Cloudformation, CDK, etc.
LocalStack (at 28th July 2024) does not implement IAM security rules so a developer’s deployment code will not be tested for the enforcement of IAM policies.
Some endpoints (such as S3) require configuration so that the AWS API responds with URLs that can be used by the application correctly.
Using a “fresh” environment for development pipelines can be simulated by running a “fresh” LocalStack container. For example you can do a System Test environment by using a new container, provisioning and then running system testing.
If you have a highly managed and siloed corporate deployment environment, it may be easier, quicker and more pragmatic to configure LocalStack for your development team then attempt to have multiple accounts provisioned and managed by multiple specialist teams.
When is an AWS Account per developer a good approach?
An AWS account per developer can remove a lot of complexity in the build process. Rather than managing the stub endpoints and configuration, developers can be forced to deploy with security rules such as IAM roles and consider costing of services as part of the development process.
However this requires a high level of account provisioning and policy automation. Accounts need to be monitored for cost control and features such as account destruction and cost saving shutdowns need to be implemented. Security scans for policy issues, etc can be implemented across accounts and policies for AWS technology usage can be controlled using AWS Organisations.
An account per developer opens a small step to account per environment which allows the provisioning of say System Test environments on an ad hoc basis. AWS best practices for security also suggest account per service to limit blast radius and maintain separate controls for critical services such as payment processing.
If the organisation already has centralised account policy management and a strong provisioning team(s), this may be an effective approach to reduce the complexity in development while allowing modern automated pipeline practices.
Conclusion
Approach
Pros
Cons
LocalStack
Can be deployed on a developer’s machine.
Does not require using managed environments in a corporate setting.
Can be used with AWS-SDKs, AWS-CLI, Cloudformation, SAM, CDK for deployments
Development environments are separated without naming conventions in shared accounts, etc.
Fresh LocalStacks can be used to mimic environments for various development pipeline stages.
Development environment control within the development team.
Requires application configuration to use LocalStack.
Does not test security policies before deployment.
Maven is known to be a verbose, opinionated framework for building applications, primarily for a Java Stack. In this article we discuss Lime Mojito’s view on maven, and how we use it to produce maintainable, repeatable builds using modern features such as automated testing, AWS stubbing (LocalStack) and deployment. We have OSS standards you can use in your own maven builds at https://bitbucket.org/limemojito/oss-maven-standards/src/master/ and POM’s on maven central.
Before we look at our standards, we set the context of what drives our build design by looking at our technology choices. We’ll cover why our developer builds are setup this way, but not how our Agile Continuous Integration works in this post.
Lime Mojito’s Technology Choices
Lime Mojito uses a Java based technology stack with Spring, provisioned on AWS. We use AWS CDK (Java) for provisioning and our lone exception is for web based user interfaces (UI), where we use Typescript and React with Material UI and AWS Amplify.
Our build system is developer machine first focused, using Maven as the main build system for all components other than the UI.
Build Charter
The build enforces our development standards to reduce the code review load.
The build must have a simple developer interface – mvn clean install.
If the clean install passes – we can move to source Pull Request (PR).
PR is important, as when a PR is merged we may automatically deploy to production.
Creating a new project or module must not require a lot of configuration (“xml hell”).
A module must not depend on another running Lime Mojito module for testing.
Any stub resources for testing must be a docker image.
This example will do all the below with only 6 lines of extra XML in your maven pom.xml file:
enforce your dependencies are a single java version
resolve dependencies via the Bill of Materials Library that we use too smooth out our Spring + Spring Boot + Spring Cloud + Spring Function + AWS SDK(s) dependency web.
Enable Lombok for easier java development with less boilerplate
Configure code signing
Configure maven repository deployment locations (I suggest overriding these for your own deployments!)
When you add dependencies, common ones that are in or resolved via our library pom.xml do not need version numbers as they are managed by our modern Bill of Materials (BOM) style dependency setup.
Our Open Source Standards library supports the following module types (archetypes) out of the box:
Type
Description
java-development
Base POM used to configure deployment locations, checkstyle, enforcer, docker, plugin versions, profiles, etc. Designed to be extended for different archetypes (JAR, WAR, etc.).
jar-development
Build a jar file with test and docker support
jar-lamda-development
Build a Spring Boot Cloud Function jar suitable for lambda use (java 17 Runtime) with AWS dependencies added by default. Jar is shaded for simple upload.
spring-boot-development
Spring boot jar constructed with the base spring-boot-starter and lime mojito aws-utilities for local stack support.
Available Module Development Types
We hope that you might find these standards interesting to try out.
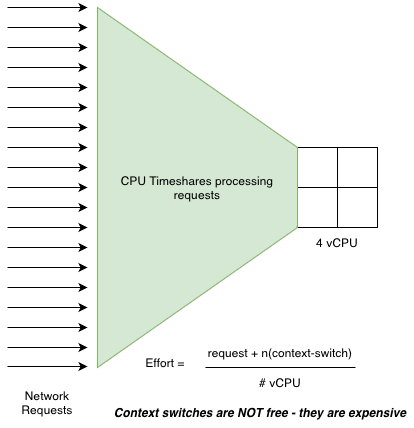
We have a web service responding to web requests. The service has a thread pool where each web request uses one operating system thread. The requests are then managed by a multi-core CPU that time-slices between the various threads using the operating system scheduler.
This example is very similar to how Tomcat (Spring Boot MVC) works out of the box when servicing requests with servlets in the Java web server space. The Java VM (v17) matches a Java Thread to an operating system thread that is then scheduled for execution by a core.
So what happens when we have a lot of requests?
Many threads here are sliced between the 4 cores. This slicing of threads where a core works on one for a while, then context switches to another thread, can scale to any level. However, there is an expense in CPU time to switch between one thread to another. This context switch is expensive as it involves both memory and CPU manipulation.
Given enough threads, the CPU cores can quickly spend a significant amount of time context switching when compared to the actual amount of time processing the request.
How do we reduce context switching?
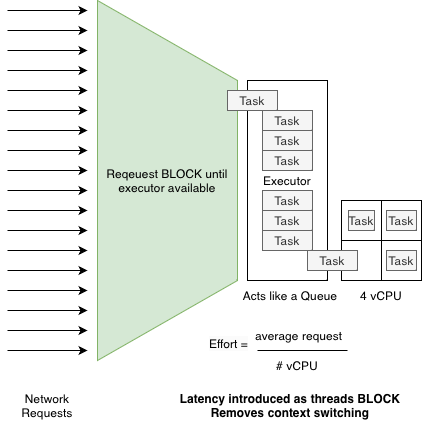
We can trade off context switching for latency by blocking a request thread until a vCPU is available to do the work. Provided the work is largely CPU bound this may reduce the overall throughput time if the context switching has become a major use of the available vCPU resources.
For our Java spring boot based application we introduce one of the standard Executors to provide a blocking task service. We use a WorkStealingPool which is an executor that defaults the worker threads to the number of CPUs available with an unlimited queue depth.
We now move the CPU heavy process into a task that can be scheduled onto the executor by a given thread. The thread will then block on the Future returned from submitting the task – this blocking occurs until a worker thread has completed the task’s job and returned a result.
On our application, this returned a 5X improvement to average throughput times for the same work being submitted to a single microservice performing the request processing. This goes to show that in our situation the majority of CPU was being spent on context switching between requests rather than servicing the CPU intensive task for each request.
In our case this translated to 5X less CPU required and a similar reduction in our AWS EC2 costs for this service as we needed less instances provisioned to support the same load.
After finding Native Java Lambda to be too fragile for runtimes we investigated AWS Snap Start to speed up our cold starts for Java Lambda. While not as fast as native, Snap Start is a supported AWS Runtime mode for Lambda and it is far easier to build and deploy compared to the requirements for native lambda.
How does Snap Start Work?
Snap Start runs up your Java lambda in the initialisation phase, then takes a VM snapshot. That snapshot becomes the starting point for a cold start when the lambda initialises, rather than the startup time of your java application.
With Spring Boot this shows a large decrease in cold start time as the JVM initialisation, reflection and general image setup is happening before the first request is sent.
Snap Start is configured by saving a Version of your lambda. This version phase takes the VM snapshot and loads that instead of the standard java runtime initialisation phase. The runtime required is the offical Amazon Lambda Runtime and no custom images are required.
What are the trade offs for Snap Start?
Version Publishing needs to be added to the lambda deployment. The deployment time is longer as that image needs to be taken when the version is published.
VM shared resources may behave differently to development as they are re-hydrated before use in the cold start case. For example DB connection pools will need to fail and reconnect as they be begin at request time in a disconnected state. However see AWS RDS Proxy for this serverless use case.
As at 26th August 2023 SnapStart is limited to the x86 Architecture for Lambda runtimes.
What are the speed differences?
After warm up there was no difference between a hot JVM and the native compiled hello world program. Cold start however showed a marked difference from memory settings of 512MB and higher due to the proportional allocation of more vCPU.
Times below are in milliseconds.
Architecture
256
512
1024
Java
5066
4054
3514
SnapStart
4689.22
2345.2
1713.82
Native
1002
773
670
Comparison of Architecture v Lambda Memory Configuration
At 1GB with have approximately 1 vCPU for the lambda runtime which makes a significant difference to the cold start times. Memory settings higher than 1vCPU had little effect.
While native is over twice as fast as SnapStart the fragility of deployment for lambda and the massive increase in build times and agent CPU requirements due to compilation was un productive for our use cases.
Snap start adds around 3 minutes to deployments to take the version snapshot (on AWS resources) which we consider acceptable compared to the build agent increase that we needed to do for native (6vCPU and 8GB). As we are back to Java and scripting our agents are back down to 2vCPU and 2GB with build times less than 10 minutes.
How do you integrate Snap Start with AWS CDK?
This is a little tricky as there are not specific CDK Function props to enable SnapStart (as at 26th August 2023). With CDK we have to fall back to a cloud formation primitive to enable snap start and then take a version
final IFunction function = new Function(this,
LAMBDA_FUNCTION_ID,
FunctionProps.builder()
.functionName(LAMBDA_FUNCTION_ID)
.description("Lambda example with Java 17")
.role(role)
.timeout(Duration.seconds(timeoutSeconds))
.memorySize(memorySize)
.environment(Map.of())
.code(assetCode)
.runtime(JAVA_17)
.handler(LAMBDA_HANDLER)
.logRetention(RetentionDays.ONE_DAY)
.architecture(X86_64)
.build());
CfnFunction cfnFunction = (CfnFunction) function.getNode().getDefaultChild();
cfnFunction.setSnapStart(CfnFunction.SnapStartProperty.builder()
.applyOn("PublishedVersions")
.build());
IFunction snapstartVersion = new Version(this,
LAMBDA_FUNCTION_ID + "-snap",
VersionProps.builder()
.lambda(function)
.description("Snapstart Version")
.build());
In CDK because Version and Function both implement IFunction, you can pass a Version to route constructs as below.
String apiId = LAMBDA_FUNCTION_ID + "-api";
HttpApi api = new HttpApi(this, apiId, HttpApiProps.builder()
.apiName(apiId)
.description("Public API for %s".formatted(LAMBDA_FUNCTION_ID))
.build());
HttpLambdaIntegration integration = new HttpLambdaIntegration(LAMBDA_FUNCTION_ID + "-integration",
snapstartVersion,
HttpLambdaIntegrationProps.builder()
.payloadFormatVersion(
VERSION_2_0)
.build());
HttpRoute build = HttpRoute.Builder.create(this, LAMBDA_FUNCTION_ID + "-route")
.routeKey(HttpRouteKey.with("/" + LAMBDA_FUNCTION_ID, HttpMethod.GET))
.httpApi(api)
.integration(integration)
.build();
Note in the HttpLambdaIntegration that we pass a Version rather than the Function object. This produces the Cloudformation that links the API Gateway integration to your published Snap Start version of the Java Lambda.
Update: 20/8/2023: After the CDK announcement that node 16 is no longer supported after September 2023 we realised that we can’t run CDK and node on Amazon Linux2 for our build agents. We upgraded our agents to AL2023 and found out the native build produces incompatible binaries due to GLIBC upgrades, and Lambda does not support AL2023 runtimes. We have given up with this native approach due to the fragility of the platform and are investigating AWS Snapstart which now has Java 17 support.
Update: 02/9/2023: We have switched to AWS Snap Start as it appears to be a better trade off for application portability. Short builds and no more binary compatibility issues.
Native Java AWS Lambda refers to Java program that has been compiled down to native instructions so we can get faster “cold start” times on AWS Lambda deployments.
Cold start is the initial time spent in a Lambda Function when it is first deployed by AWS and run up to respond to a request. These cold start times are visible to a caller has higher latency to the first lambda request. Java applications are known for their high cold start times due to the time taken to spin up the Java Virtual Machine and the loading of various java libraries.
We built a small framework that can assemble either a AWS Lambda Java runtime zip, or a provided container implementation of a hello world function. The container provided version is an Amazon Linux 2 Lambda Runtime with a bootstrap shell script that runs our Native Java implementation.
Note that these timings were against the raw hello java lambda (not the spring cloud function version).
@Slf4j
public class MethodHandler {
public String handleRequest(String input, Context context) {
log.info("Input: " + input);
return "Hello World - " + input;
}
}
Native Java AWS Lambda timings
We open with a “Cold Start” – the time taken to provision the Lambda Function and run the first request. Then a single request to the hot lambda to get the pre-JIT (Just-In-Time compiler) latency. Then ten requests to warm the lambda further so we have some JIT activity. Max Memory use is also shown to get a feel system usage. We run up to 1GB memory sizing to approach 1vCPU as per various discussions online.
Note that we run the lambda at various AWS lambda memory settings as there is a direct proportional link between vCPU allocation and the amount of memory allocated to a lambda (see AWS documentation).
This first set of timings is for a Java 17 Lambda Runtime container running a zip of the hello world function. Times are in milliseconds.
Java Container
128
256
512
1024
Cold Start
6464
5066
4054
3514
1
90
52
16
5
10X
60
30
5
4
Max Mem
126
152
150
150
Java Container Results
Native Java
128
256
512
1024
Cold
1427
1002
773
670
1
10
4
4
5
10X
4
4
3
3
Max Mem
111
119
119
119
Native Java Results
The comparison of the times below show the large performance gains for cold start.
Conclusion
From our results we have a 6X performance improvement in cold starts leading to sub second performance for the initial request.
The native version shows a more consistent warm lambda behaviour due to the native lambda compilation process. Note that the execution times seem to trend for both Java and native down to sub 10ms response times.
While there is a reduction in memory usage this is of no realisable benefit as we configure a larger memory size to get more of a vCPU allocation.
However be aware thatbuild times increased markedly due to the compilation phase (from 2 minutes to 8 for a hello world application). This compilation phase is very CPU and memory intensive so we had to increase our build agents to 6vCPU and 8GB for compiles to work.
How to integrate AWS Cognito and Spring Security using JSON Web Tokens (JWT), Cognito groups and mapping to Spring Security Roles. Annotations are used to secure Java methods.
Authorisation flow for a web request.
AWS Cognito Configuration
Configure a user pool.
Apply a web client
Create a user with a group.
The user pool can be created from the AWS web console. The User Pool represents a collection of users with attributes, for more information see the amazon documentation.
An app client should be created that can generate JWT tokens on authentication. An example client configuration is below, and can be created from the pool settings in the Amazon web console. This client uses a simple username/password flow to generate id, access and refresh tokens on a successful auth.
Note this form of client authentication flow is not recommended for production use.
User Password Auth Client
We can now add a group so that we can bind new users to a group membership. This is added from the group tab on the user pool console.
Creating a user
We can easily create a user using the aws command line.
The curl example below will generate a token for our hello test user. Note that you will need to adjust the URL to the region your user pool is in, and the client id as required. The client ID can be retrieved from the App Client Information page in the AWS Cognito web console.
We start by configuring a Spring Security OAuth 2.0 Resource server. This resource server represents our service and will be guarded by the AWS Cognito access token. This JWT contains the cognito claims as configured in the Cognito User Pool.
This configuration is simply to point the issuer URL (JWT iss claim) to the Cognito Issuer URL for your User Pool.
The following security configuration enables Spring Security method level authorisation using annotations, and configures the Resource Server to split the Cognito Groups claim into a set of roles that can be mapped by the Spring Security Framework.
This Spring Security configuration maps a default role, “USER” to all valid tokens, plus each of the group names in the JWT claim cognito:groups is mapped a a spring role of the same name. As per spring naming conventions, each role has the name prefixed with “ROLE_”. We also allow spring boot actuator in this example to function without any authentication, which gives us a health endpoint, etc. In production you will want to bar access to these URLs.
A now a code example of the annotations used to secure a method. The method below, annotated by PreAuthorize, requires a group of Admin to be linked to the user calling the method. Note that the role “Admin” amps to the spring security role “ROLE_Admin” which will be sourced from the Cognito group membership of “Admin” as previously configured in our Cognito setup above.
That’s it! You now have a working example for configuring cognito and Spring Security to work together. As this is based on the Authorisation header with a bearer token, it will work with minimal configuration of API Gateway, Lambda, etc.
One of the drawbacks with Spring Cloud Configuration Server is that the server needs to be running before applications can be spun up. As we have become more cloud native on AWS we’ve wanted to move to AWS centric configuration systems, but to do that we needed a path from the existing git version control system (VCS) based config server.
So what we were missing was an easy conversion to AWS Parameter Store from Spring Cloud Config.
How
We liked Spring Cloud Config Server for many years, as it provided the following benefits:
git Version control with encryption-at-rest for application config.
a single point of control for all applications as we could set global configurations that affected all applications deployed.
A very simple bootstrap.yml file for startup without having to specify a lot of configuration.
We use Spring Cloud AWS (now awspring.io) libraries in a lot of our applications, and the support for both AWS parameter store and secrets manager are now baked into a spring boot starter.
A quick experiment showed some benefits for going to AWS parameter store based config
configuration always available without remote hosted config server.
use of secureString could replace our encryption at rest with config server
bootstrap is even simpler with just the application name required.
still supports “global” spring application configuration, which we use a lot with Jackson.
We like having our application config in git, as this gives us a simple code on branch, review and merge process using bitbucket. This was the only drawback with going to AWS PS, but surely could be solved with some code.
We’re in a slow move to serverless, so any chance to remove the need for a low utilisation server gets us a step closer to no clusters.
So we are pleased to announce a small Open Source java jar that allows you to convert a single or a directory of yaml spring configuration files to AWS parameter store following the path and naming convention for Spring Cloud AWS. It included support for spring profiles conversion, AWS tagging the parameters and updating changed or new values on repeated runs. The command line tool does NOT delete parameters, though the code has support for removing an application by name including all of its profiles.
We have configured our own build server to checkout the configuration server repo, and run our tool over the yaml files to keep them in sync with parameter store.
For more information on using parameter store with a boot application, please see the configuration steps using Spring Cloud AWS in your Spring Boot application.